Author: Simon

  • Test Planning Simplified

    Test Planning Simplified

    In my experiences of planning for testing in various different environments, and across a number of teams and organisations, the value of that planning was never the document itself; rather, it was the thoughts and consideration of the activities, resources and potential risks and issues yet to be discovered.

    Thinking deeply about all of those things and writing them down, in whatever form the final document took, was the real value of the exercise.

    Having those thoughts documented can of course be useful when you need to communicate the testing activities across a team of subordinates. It’s not quite so useful for communicating your intentions as they relate to testing activities to your stakeholders.

    It’s far better to have those people in the room with you while you’re formulating your plan, so that they can provide you with the information you need to do that planning; and so that they have a say in the what, when, who, where, how of your test plan.

    Pro-Tip: When writing a test plan, keep the 5 W’s front of mind: What, When, Who, Where, hoW.

    • What will (and won’t) be tested? – The scope of your testing activities.
    • How will it be tested? – The technical details of your testing; approaches, tools, environments, data, automation etc.
    • Who will test it? – What human resources will you need to keep the testing on track?
    • Why does it need testing? – Your rationale for committing time and resources to testing specific areas, over others. What are the risks to be addressed?
    • When will testing start and finish? – What are the entry and exit requirements for your testing? How long will it take?

    In ye-olde days of testing, I used to spend substantial amounts of time pulling together lengthy master test plan documents, in the region of 30-60 pages long (depending on the complexity of the project). Always with the sneaking feeling that they would probably not be read with the same amount of care I put into writing them.

    Thankfully, with the ascent of more agile/lean ways of working, stakeholders have somewhat less patience for documentation of this nature. And they would often prefer and expect to be directly included in the planning process.

    With that in mind, a leaner test planning and documentation mechanism is preferred. So I present to you 3x options for collaboratively documenting your test plan below.

    Mindmapping Your Test Plan

    I’ve found mindmapping generally to be an invaluable tool during the course of my software testing career. Whenever I have a problem or a piece of analysis to do, mindmaps – whether in digitial or notebook (pen & paper) form are my goto tool for exploring the problem space. And it’s the exploration of the test plan problem space that I’d happily recommend using a mindmap for also.

    Here’s how I’d approach writing a test plan document in mindmap form, step-by-step;

    [1] Start with a central node. What needs to be delivered? What is the outcome your stakeholders are looking to accomplish? This should form the locus of your testing efforts.

    [2] From this central point, create branches for the other key components of your test plan:

    • Testing scope – What will you address with your testing (in scope)? What will you not address (out of scope)?
    • Timescale – When will the testing start & finish?
    • Testing resources – Who will do the testing? What will they need? Where will they do it?
    • Testing approaches – How will the testing be carried out?
    • Risks & assumptions – What obstacles can you foresee? How will those be addressed?

    [3] From those branches, drill down further into the various items and activities. For the scope, you can take the requirements, features or stories as being the next level down (sub-branches of the Testing Scope branch); and once you have those, you can drill further down into specific test cases, scenarios, exploratory sessions or whatever is needed depending on your preferred testing style.

    [4] Do the same thing with all the other nodes and branches until you have enough detail for a test approach which stands up to some level of scrutiny from your stakeholders and team.

    Pro-Tip: Don’t aim for perfection with your test plan. Whatever form it takes. Expect your stakeholders and team to probe the initial plan with some questions. You can update and revise it, and that process is much less painful if you haven’t already convinced yourself that the test planning is “done”. You should consider it a working document, subject to constant revision and updates based on the progress of your testing.

    Once done, you will have ended up with a document that may look something like this, or completely different depending on the specifics of your approach and context. Either way is fine. As I mentioned earlier, the value of the test plan is in the planning (i.e. the thinking), not the document.

    For super bonus points, you should create your mindmap collaboratively with the key stakeholders for the project or deliverable. Walk through all your thinking and rationale with them. Design the test plan together in a workshop. Give them the opportunity to add their own thoughts and ideas, and to buy into your approach as a result. The implementation and execution of your test plan will go more smoothly as a result.

    Here’s a few more examples of mindmapping in the testing spaces:

    The Single Page Test Plan

    A similar approach is to use (or attempt) a single page test document.

    In terms of content, you’ll probably find that taking this approach covers much the same ground as using a mindmap – since really; what is a mindmap other than a stylised set of indented lists?

    Some people don’t like reading or looking at mindmaps though, finding them confusing or otherwise difficult to get their heads around. Using a simple one-page document addresses this objection, while keeping your test plan nice and lean still.

    The scope of your document and the sequence of steps to be followed is virtually identical too:

    [1] Identify the questions to be answered or addressed by your test plan (remember the 5 W’s). Use those as your section headers. You’ll probably end up with something like the following (looks familiar, huh?):

    • Testing scope
    • Timescale
    • Testing resources
    • Testing approaches
    • Risks & assumptions

    [2] Capture the necessary information on your document. Ideally in bullet point form, but provide further information (diagrams, models, tables etc) as needed.

    You might (and in fact will likely) discover that your test plan doesn’t quite fit onto one page. Don’t worry about it. So long as the intention is to minimise the amount of extraneous information, you’ll be fine. Just make sure you capture the necessary information your stakeholders and testers need to enact the various items on the plan.

    Pro-Tip: Use a text editor to capture the plan details rather than a formatting heavy tool like Word or Google Docs. Using a simple text editor and marking up your text will save space and preserve your intent to keep the doc down to a single page.

    I’ve found that this is a good way to facilitate collaborative test planning as well. Get everyone into a room (virtually, or physically) and project or share the document you’re working on. Write the document as you’re collaborating. Capture the ideas of your entire team and any stakeholders in the room. Reflect their thoughts back to them as words on the page. If you follow this approach, you’ll start finding it very easy to get support from people, since the document contains their own words, as captured during your collaborative test planning session.

    The Testing Canvas

    Another iteration on the same line of thought is the testing canvas.

    I’ve never been a huge fan of canvases personally, but they seem to have a lot of traction in the lean and agile worlds – so I’ll go along with it where necessary.

    On the assumption that you have a fairly well defined set of sections for your test plan (such as the ones I’ve already mentioned a couple of times above), mapping those sections onto a testing canvas is a trivial task. Here’s a few examples to give you an idea of what I mean:

    Again, the key benefit of following this kind of an approach is to provide a good mechanism for people to collaborate on the test planning. So, you could do this in several ways depending on what works best for your team:

    • In a meeting room, using a white board to create the sections, and Post-It notes for the activities
    • Create a spreadsheet with the various sections, and collaborate on that in a virtual space

    Or you could use some other tools. Trello for example.

    Test planning simplified

    I’m a big fan of this quote from Helmut von Moltke:

    “No plan survives first contact with the enemy.:

    I especially like Mike Tyson’s version of the same truism:

    “Everybody thinks they have a plan, until they get punched in the face.”

    In the era of Modern Testing, you don’t need a lengthy test plan document to express your intent over the course of an iteration, or even an entire project. Most often, you just need to be sure you’ve identified what needs to be done, by when and whom, how it will be done and what resources you’ll need to do so.

    More often than not, those ideas can be captured quickly and easily using a leaner form of documentation such as the ones above.

    As I mentioned at the start of this article, the plan itself isn’t the important thing. It’s the thinking that goes into the plan that’s important. The plan itself is at best an intermediary document capturing a statement of intent from a specific point in time. It will almost certainly change as the project evolves and more information surfaces.

    Rather than creating a huge document which goes out of date almost the moment it is completed, focus on the creation of smaller, leaner pieces of documentation which can more easily be updated when needed.

    And above all, collaborate. All of the approaches I mentioned above can be used to facilitate meaningful collaboration between the person(s) responsible for steering the test effort, and the people with a deep interest in the outcome of that effort.

    What’s more, using mindmapping tools in particular work very well in the online meeting space – since people can very clearly see the mindmap evolve during the course of a discussion. The same can be said of the one-page plan and the testing canvas, but the mindmap is a much more visual tool. Using something like XMind for example will give you the ability to demonstrate relationships between various items in the plan quickly and easily, and to call them out using graphical elements.

  • 7 Things Awesome Testers do That Don’t Look Like Testing

    7 Things Awesome Testers do That Don’t Look Like Testing

    If you’re supervising testers, or if you have testers on your team or in your organisation, you probably see them doing a whole bunch of stuff that doesn’t look much like testing…

    • That conversation you see them having with the developer, product owner or scrum-master. Not testing.
    • The time they spent researching a new emulation tool. That wasn’t testing either.
    • All that effort put into building and configuring environments. Not testing. Well, maybe a little bit of testing. But more like a preamble to the main event.
    • Oh yeah – and that presentation they did for their team to the department. You guessed it. Not testing.

    Obviously testers are paid to test. I mean, the clue’s in the job title – right?

    So why are they doing all this other, non-testing, stuff? And is it adding any value?

    Let’s take a look and see shall we?

    Talking

    Prior to my illustrious career in the world of I.T., I worked in a number of other roles where talking was definitely not seen as a value adding activity. In a number of them in fact, it would have been seen as a value diminishing activity instead. You may be inclined to think likewise when you see your tester having one-to-one or one-to-many conversations within your team. But look a little harder.

    Talking with, questioning, enquiring of and sometimes even interviewing developers, product owners, other testers and members of the team is a vital part of your testers work. Great testers will use this time to drill deep down into the work that’s being carried out establishing the what, how, when, why and whom of stories and on the results of those conversations, how they need to test.

    Some testers don’t even need to touch the keyboard to find a defect. They’ll be able to do it simply by asking your developers the right questions.

    Relating

    Being able to have the kind of conversations that lead – if not necessarily to defects being identified or fixed before they even become a problem – to powerful insights, requires some effort up-front to build a decent working relationship. The wheels need to be greased a bit.

    Awesome testers spend time developing their social skills. They understand that teams are complex systems and are wary of the intended and unintended consequences of their interactions with the system. They might even go so far as to treat it like another application under test, making small changes to their relational behaviours and observing the results.

    Then they’ll go ahead and process the feedback to ensure they’re speaking to people at the right time, in the right place, with the right information to hand – to make sure they get the best results from their interactions.

    Writing

    Not all teams fix bugs on the basis of a conversation or a Post-It note. Sometimes your tester will need to write a defect report. They’ll need to know how to get the required information across in a clear and succinct fashion. Learning to write a decent report takes some effort.

    Sometimes those reports will need to be a little longer. Your tester might need to write a strategy, or a test process or programme report. That report might get circulated both in and outside of the organisation and be seen with varying levels of interest by any number of stakeholders. Having the ability to write and communicate pertinent information in a compelling fashion is a skill. It takes some effort to acquire and develop.

    Having a tester who is willing to invest the time and effort in learning how to write properly is a bonus, because they’ll not only write better, they’ll think more clearly too.

    Thinking

    Of course, writing isn’t the only tool your tester can use to sharpen their thinking. They’ll probably have a toolbox full. If you poke around inside the toolbox, you’ll find some heuristics, mnemonics and creative prompts.

    You’ll find your tester has many thinking hats and that those hats help her to approach problems from a number of different directions depending on the context in which she’s working.

    Like your developers, the most important work is taking place inside of your testers head – long before they ever touch a keyboard.

    Learning

    Most human achievements began with a test of some description, so you can expect your tester to be enthusiastic in learning about the world around them. In a professional capacity, that’s likely to mean desires to learn about the organisation, the domain, the technologies, architecture and specifics of the software under test for starters. But there may be some other passions too.

    One of the traits of great testers is a willingness to follow their nose. To pursue their quarry wherever it may lead. Sometimes the hunt will lead them some place amazing, and they’ll discover philosophies, insights and other valuables that will drive their testing skill to new heights. Other times, the hunt may take them down a hole from which they need rescuing.

    Don’t ever quench their passion for the hunt though. Because when they find something good, it won’t only benefit them. It has the potential to make your team and product better too.

    Sharing

    The best testers have learned to share their kills. To bring them home and divide them amongst the team. Above and beyond that, if they’ve developed their communication skills sufficiently they may be willing to share their learnings with the wider organisation, their local, national or international tech communities.

    Turning what they’ve learned into blogposts, articles, presentations, workshops or other learning platforms, as well as applying their learning in the day job, just reinforces the value of their learning at a personal level – and helps to build up the people with whom they work.

    Building

    If your tester isn’t looking for ways to improve the speed, scope and efficiency of their testing efforts on a daily basis – then you probably hired the wrong person. Increasing the breadth and depth of their testing will be a natural consequence of your tester wanting to learn more about the software, system and architecture under test – so of course they’ll want to build tools to help them do it.

    The tools they build may not look like how you expect though. Your tester might leverage some existing platform or toolset, extending its capabilities or repurposing it to their needs. Or they might develop some customised data to be injected into the application for more effective testing. They may develop a script or a tool from scratch that helps extend their own testing skills, scaling them up so more testing can be carried out faster than ever before.

    Their tools may not even be software related. The tools of your tester may well be more facilitative than hands on. Watch them though and encourage them to develop a toolkit that complements their skillset.

    Testers should develop skills in many areas

    It may not have occurred to you before that these are all skills that your testers can develop and that will serve them well in their testing efforts. Each one of them adds significant value to the project on which they work, your team, your organisation and when shared outwards – with the testing and tech community as a whole.

    But not only that – they’ll benefit them personally. Each of these skills is broadly applicable not only in a work context but in life. They’ll help them to be a better person, a better friend, a better partner, a better human being. And because they’re so broadly applicable – they can take them anywhere they need them. From role to role, organisation to organisation.

    They’re valuable assets. Testers should look for opportunities to acquire them, and to apply them whenever they can. I’ve listed a few starting points below. If you have some further suggestions I’d love to hear about them in the comments.

    • Talking – Karen Johnson delivered an excellent talk on The Art of Asking Questions at TestBash 2015 that exemplars questioning, interviewing and of course listening techniques
    • Relating – It’s not quite the same thing, but if you think about software testing from an anthropological or social science perspective – then you arrive at the work of Huib Schoots and John Stevenson.
    • Writing – James Bach and Jerry Weinberg have both had much to say about the practice and benefits of developing a good writing habit.
    • Thinking – John Stevenson has delivered a number of workshops and written an entire book on the psychology of software testing.
    • Learning – Check out James Bach’s book Buccaneer Scholar for more on the benefits of a constantly evolving and unbounded learning philosophy.
    • Sharing – There are various communities within which the sharing of tools, tips, techniques, approaches and thinking is rife. A great place to start is The Ministry of Testing.
    • Building – James Bach / Michael Bolton – have written a paper on automation in testing that anyone who aspires to develop and build testing tools or simply do more effective testing should read.
  • Automating PDF’s and Windows Objects with Python and Webdriver

    Automating PDF’s and Windows Objects with Python and Webdriver

    At my current gig I needed a way to check the print styling wasn’t broken across a range of pages and browsers. It was an obvious candidate for automation and, since I hadn’t had much of an opportunity to build my Python skills – decided to write the script in Python.

    I envisaged the script as being relatively straightforward. Using Webdriver I would insruct the browser to go to the pages we wanted to check, execute the print function and then check the output. Of course, we didn’t want all of those prints to actually end up in the printer. So the first step was to identify a solution that would enable us to print to PDF. Although CutePDF Writer allows you to print to PDF by default, it doesn’t allow you to just save the pdf file. So instead I ended up using NovaPDF, which allows you to setup a custom profile and save the pdf straight to a predefined directory.

    Having done that, I was able to implement the following code, which sets-up the Firefox Webdriver instance with a “always_print_silent” profile. This means that when the print function is activated, it won’t open any kind of dialogue. It will just print to whatever the default printer driver has been set to.

    The script imports all of the URL’s we want to check via a CSV file. Once the browser is open, it navigates to all of the URL’s in the file, calls the javascript window.print() function, and due to the “always_print_silent” profile, saves the resulting output with the help of NovaPDF.

        # script relies on having novaPDF (www.novapdf.com) installed in order to print to PDF
        # AND configure the PDF printer to silently save to a pre-defined location
    
        # selenium imports
        from selenium import webdriver
        from selenium.webdriver.common.keys import Keys
        # csv reader import
        import csv, time
    
        # need to setup a webdriver profile so that the print dialog screen is skipped
        FFprofile = webdriver.FirefoxProfile()
        FFprofile.set_preference('print.always_print_silent', True)
    
        # create driver with the profile
        driver = webdriver.Firefox(FFprofile)
    
        # open the CSV file
        with open('data/barnetPrintURLs.csv') as csvfile:
            urlReader = csv.reader(csvfile, delimiter=',', quotechar='|')
    
                #loop through the CSV and check all the URL's
            for row in urlReader:
                driver.get(row)
                # execute javascript to print the page
                driver.execute_script("window.print()")
                time.sleep(10)
                
        driver.quit()
    

    So far so good.

    Next up was Chromedriver, and things started to get a bit more complicated – since Chromedriver doesn’t support silent printing. 🙁 This meant that every time the window.print() function was called I ended up with a Windows print dialogue. I can’t interact with the dialogue window inside of Webdriver, so I needed some other solution.

    Fortunately, Python provides some tools with which to accomplish this task.

    SWAPY, or Simple Windows Automation on Python which provides a Python interface to Windows objects. In much the same way as you might once have been able to identify objects using,  e.g. Quick Test Pro – you can use the SWAPY interface to interact with Windows programs and convert actions into Python code, which can then be implemented in a script by calling the pywinauto library.

    In the screenshot below, you can see I’ve selected the Print dialog, selected the &Print function (the Print button) and generated some pywinauto code in the Editor window.

    pywinauto code in editor window

    Having utilised SWAPY to identify the dialog and the actions needed to ineract with it, I just needed to incorporate those actions into my Python script.  That’’s just a matter of installing the pywinauto library (and sendkeys, and the Microsoft C++ compiler which is only compatible with Python 2.* – see code comments) and adding some additional code to my script to deal with wait conditions etc, below:

    # selenium imports
    from selenium import webdriver
    from selenium.webdriver.common.keys import Keys
    # additional Chromedriver specific import
    from selenium.webdriver.chrome.options import Options
    # Chromedriver doesn't support silent printing - so we need to interact with Windows using pywinauto nauto.pbworks.com/w/page/9546218/Installation
    # (which also requires sendkeys https://pypi.python.org/pypi/SendKeys/0.3 
    # and Microsoft Visual C++ Compiler for Python 2.7 http://www.microsoft.com/en-us/download/details.aspx?id=44266)
    import pywinauto, time
    
    # need to setup a webdriver profile so that the print dialog screen is skipped
    chrome_options = Options()
    chrome_options.add_argument("--disable-print-preview")
     
    # create the pywinauto object
    pwa_app = pywinauto.Application() 
    
    # get the url's
    with open('data/barnetPrintURLs.txt', 'r') as urls:
    	# for each line in the file navigate to the url
    	for line in urls:
    		# create driver with the profile
    		driver = webdriver.Chrome(chrome_options=chrome_options)
    		driver.get(line)
    
    		# execute javascript to print the page
    		driver.execute_script("window.print()")
    		
    		# now use pywinauto to interact with the Windows dialog and click the print button
    		try:
    			a_check = lambda: pywinauto.findwindows.find_windows(title=u'Print', class_name='#32770')[0]
    			try:
    				dialog = pywinauto.timings.WaitUntilPasses(5, 1, a_check)
    				window = pwa_app.window_(handle=dialog)
    				window.SetFocus()
    				ctrl = window['&Print']
    				ctrl.Click()
    				# need an explicit wait to allow the print to go through so we can quit the browser instance
    				time.sleep(5)
    			except:
    				print('Something went wrong')
    	
    		finally: 
    			driver.quit()
    

    In much the same way as the Firefox script, this just runs through the URL’s, navigates to the page, and activates the print function. We then have to switch to pywinauto to interact with the Windows print dialog, hit the print button and wait for the dialog to close and the print to actually be actioned, before closing the webdriver instance and starting the next loop.

    I also wrote a script to carry out the same functions in IEdriver. It follows much the same format (with a couple of additional implicit waits and checks for IE quirks) so I haven’t bothered pasting it here.

    Phew. My simple scripting exercise was a lot more complicated than I originally thought. Thankfully Python provides a lot of flexibility for doing this kind of stuff. I imagine this would also have been achievable using C# using .Net, but doubt very much whether I would be able to do this in Java or Ruby. If somebody has done this in another language, I’d be very interested in hearing about it just so I can learn how you went about it.

  • Correlating Dynamic Values in JMeter

    In previous posts I have covered:

    If you’ll recall from that last post, the login script wasn’t working yet. The actual login request (i.e. the submission of the login credentials as a request to the server to initiate a logged-in session) was failing because we weren’t providing it with all of the information it needed.

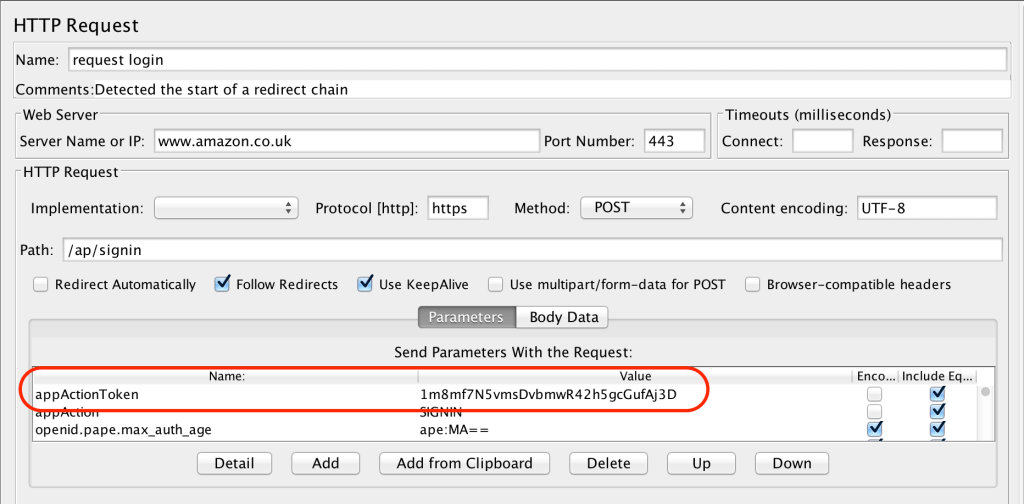
    send params with request image from JMeter

    In the Send Parameters With the Request section of the HTTP Request sampler, request login, above, we can see that there’s an AppActionToken that looks as though it’s been generated by the server, probably to uniquely identify the session. If we continue to scroll down the list of parameters, we’d see that there are a number of other tokens that are required in order to successfully login:

    appActionToken = 1m8mf7N5vmsDvbmwR42h5gcGufAj3D
    openid.pape.max_auth_age = ape:MA==
    openid.ns = ape:aHR0cDovL3NwZWNzLm9wZW5pZC5uZXQvYXV0aC8yLjA=
    openid.ns.pape = ape:aHR0cDovL3NwZWNzLm9wZW5pZC5uZXQvZXh0ZW5zaW9ucy9wYXBlLzEuMA==
    prevRID = ape:MTFESk4zWkIwQzhSSjg5SlQ0SjA=
    pageId = ape:Z2JmbGV4
    openid.identity = ape:aHR0cDovL3NwZWNzLm9wZW5pZC5uZXQvYXV0aC8yLjAvaWRlbnRpZmllcl9zZWxlY3Q=
    openid.claimed_id = ape:aHR0cDovL3NwZWNzLm9wZW5pZC5uZXQvYXV0aC8yLjAvaWRlbnRpZmllcl9zZWxlY3Q=
    openid.mode = ape:Y2hlY2tpZF9zZXR1cA==
    openid.assoc_handle = ape:Z2JmbGV4
    openid.return_to =
    ape:aHR0cHM6Ly93d3cuYW1hem9uLmNvLnVrL2dwL3lvdXJzdG9yZS9ob21lP2llPVVURjgmcmVmXz1uYXZfc2lnbmlu
    

    In addition to the dynamic parameters, we also need to submit the username and password, which are currently hardcoded as can be seen below.

    hardcoded username and password

    We could parameterise these also, but I’ll talk about that another time.

    So how do we go about obtaining the correct values for these parameters, such that when we send them all, along with some valid login credentials, we get a logged-in session back from the server?

    Well, the first thing is to figure out from whence they came. Experience has taught me that it’s usually (though by no means always) from the immediately preceding server response. So let’s go back to the results of our test and take a look:

    test results

    The HTML response isn’t telling us much… We need to switch to text mode, and then take a look for the parameter name. Let’s start with the appActionToken parameter:

    test result text mode

    Voila! We’ve found the token, and the value. But if we run the test again, we’ll probably see a different one:

    token found

    It’s a fair (in fact guaranteed) bet that we’ll find the rest of our parameters embedded within this response too.

    So what we need to try and do is extract the parameters from the server response, each time we get one – and then pass it into the next request. Performance testers call this process correlation. JMeter provides us with the Regular Expression Extractor so that we can go ahead and correlate our parameters from one request/response to another.

    The first step is to add a Regular Expression Extractor to the request login page HTTP Sampler, by right-clicking on it and then selecting Add > Post Processors > Regular Expression Extractor, thusly:

    regex extractor

    Next we need to write some Regex with which to extract the parameter.

    If, like me, the idea of writing regex makes your toes curl with horror, don’t worry. I’ll share a special piece of JMeter goodness with you. It’s the only piece of regex I’ve ever really needed to know. And it goes like this:

    (.+?)
    

    Did you get that? I’ll repeat it just in case you missed it…

    (.+?)
    

    To use this regex and get the parameter we’re looking for, I reckon something like the string below should work:

    name="appActionToken" value="(.+?)" /
    

    Trying it out in the RegExp Tester view of the response, shows that it will indeed work, since the test came back with only one match:

    regex extracted

    The RegExp Tester shows me how many matches the regex pattern will create, what the match is, and the value to be extracted – 1, 2 & 3 below respectively:

    Match count: 1
    Match[1][0]=name="appActionToken" value="pmHS1gy9iYMSJOWBIPlCWZGq1SIj3D" /
    Match[1][1]=pmHS1gy9iYMSJOWBIPlCWZGq1SIj3D
    

    What I’ve done here is, take the HTML response, and apply the simple bit of regex I described above, in order to capture only the string that we’re interested in.

    <input type="hidden" name="appActionToken" value="pmHS1gy9iYMSJOWBIPlCWZGq1SIj3D" /><input type="hidden" name="appAction" value="SIGNIN" />
    

    The “pmHS1gy9iYMSJOWBIPlCWZGq1SIj3D” bit, basically.

    I’m not going to go into how the regex works, because that’s beyond the scope of this particular post. What we do need to do now is plug it into the regex extractor so that we can use it in the request login sampler.

    Here’s how the finished extractor looks:

    regex config

    The important things to note are these:

    1. I’ve given the Regular Expression Extractor a meaningful name – appActionToken Extractor
    2. I’ve given the variable into which I want to put the extracted token a meaningful name (in the Reference Name field) – appActionToken
    3. The regular Expression field contains our regex – name=”appActionToken” value=”(.+?)” /
    4. The Template, Match No and Default Value fields are filled out more or less as per the Apache JMeter guide.

    You can learn more about the Template, Match No and Default Value fields by reading through the online guide from Apache here. I’d recommend sticking with the defaults, but you may gain some mileage in experimenting with them.

    Having extracted the value successfully and placed it in a JMeter variable, we now need to use the variable in the submit login sampler. We can do that by referencing the variable where the token was originally.

    JMeter knows we want to use a variable when we place the name inside curly parenthesis with a leading dollar sign – ${variableName}, like the below:

    using extracted regex value as a variable

    With that done, we’re almost ready to go. Except, our script still won’t work because there’s those other 10 dynamic variables we need to correlate as well. Fortunately, the process is exactly the same for all of them:

    Locate the variable in the preceding response – the request login page response in the case of our script. Construct the regex to extract the variable – as discussed above. Create a Regular Expression Extractor for each variable to be correlated. Refer to the extracted variable in the subsequent request – the submit login page in our example, as discussed above.

    Once you’ve gone ahead and done all of that, you’ll likely end up with something that looks like the below:

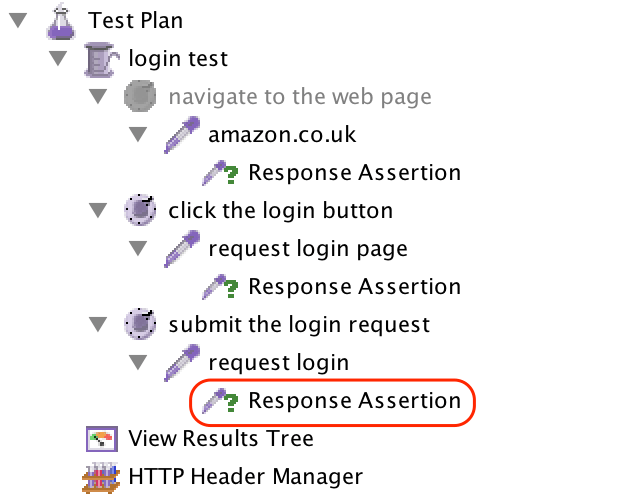
    test plan tree

    And, assuming that you’ve done everything correctly, running the test again will result in the desired logged-in response from the server:

    working test result

    We can see above the JMeter is logged in by the “Hello, jmeter” message in the response.

    We’re done! Our login script is now ready to rumble. And having covered the basics, we’re ready to tackle some more advanced JMeter topics. So stay tuned for those…

  • Recording a Login Script with JMeter

    Following on from my last couple of posts where I covered initial setup and use of the HTTP(S) Test Script Recorder, I’m going to build on what’s been done so far in order to develop a login script.

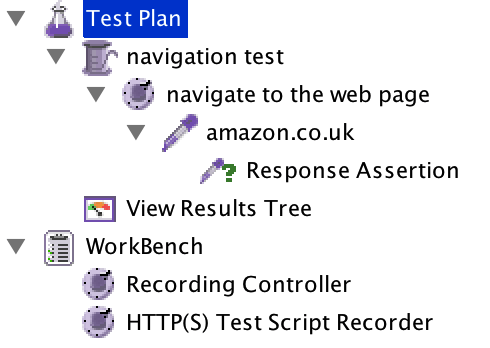
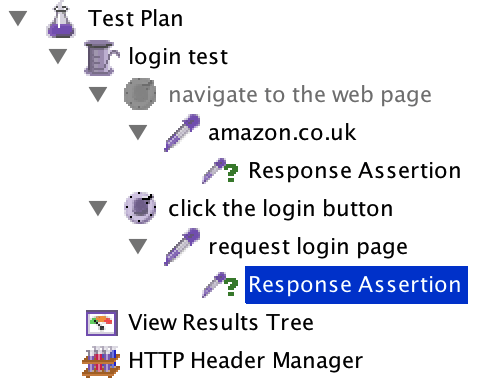
    I’m assuming that you have a test plan setup more or less identical to the below, in which case we’re good to go. If you don’t – then I suggest you read through the preceding posts before continuing further.

    test plan structure in JMeter

    The thing we need to do next is figure out what requests need to be sent in order to simulate a user login. We could try and craft them from scratch, but it’s easier to simply record what happens when I carry out a login and then modify the recorded requests to make them resilient and reusable.

    To do that – we first need to make sure that:

    The JMeter proxy is recording our requests The browser being used is directing traffic to the proxy Again if you’re not sure how to do steps 1 & 2 above, I refer you to the previous post. Assuming that your proxy is recording properly, then we can go ahead and click on the login button and see what happens:

    Amazon sign in button

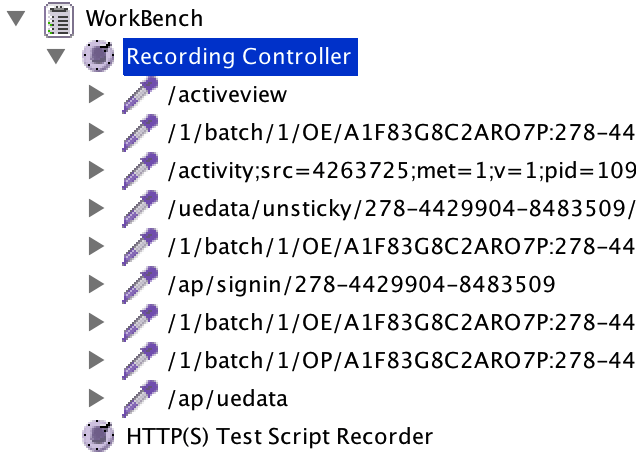
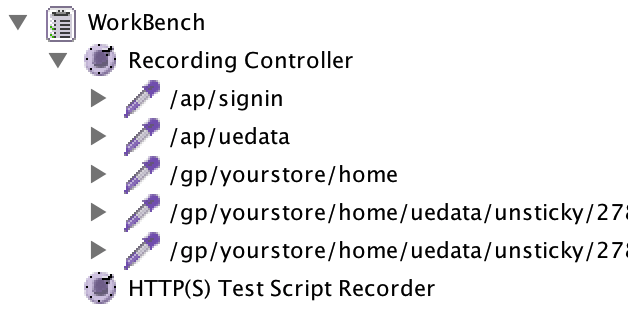
    Once you’ve done so then, under the Recording Controller you should see some activity. When I wrote this, I saw the responses below:

    recording controller

    Further examination of some of the recorded requests suggests they’re irrelevant to the task at hand. I have no idea what the request below is doing for example:

    what is this request doing?

    If I actually worked at Amazon I could probably go and ask one of the developers what’s happening here, but for the time being I’m going to assume I don’t need it.

    Of more interest to me is the /ap/signin/… request:

    app/sign-in request

    I’m intrigued by the /ap/uedata/ request also, but I’ll ignore that one too for the time being. In the meantime, I’m working with the hypothesis that the /ap/signin/… request is the one that actually requests the login page from the server.

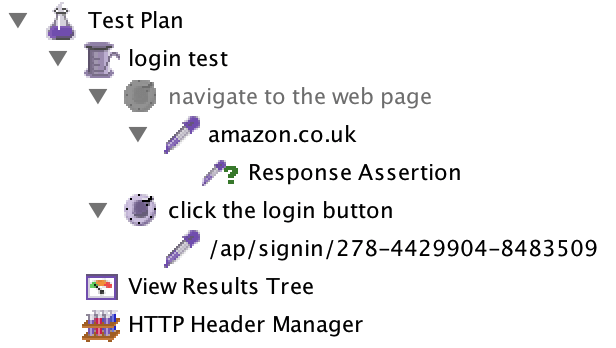
    I’ve added another Simple Controller under my Thread Group. In order to test out my hypothesis I can move that request to the Controller and run it to see what happens. I’ll disable the homepage navigation (right-click on the Controller > Disable) as well, since we don’t need that right now. Disabling it will prevent any child requests from being executed.

    simple controller

    I’ve also moved the HTTP Header Manager that was originally under the HTTP request, and placed it under the Test Plan instead. Every recorded request will be paired with one of these, but we only need one of them to act as a default for the entire test. All subsequent header managers can be discarded, otherwise they’ll just clutter things up.

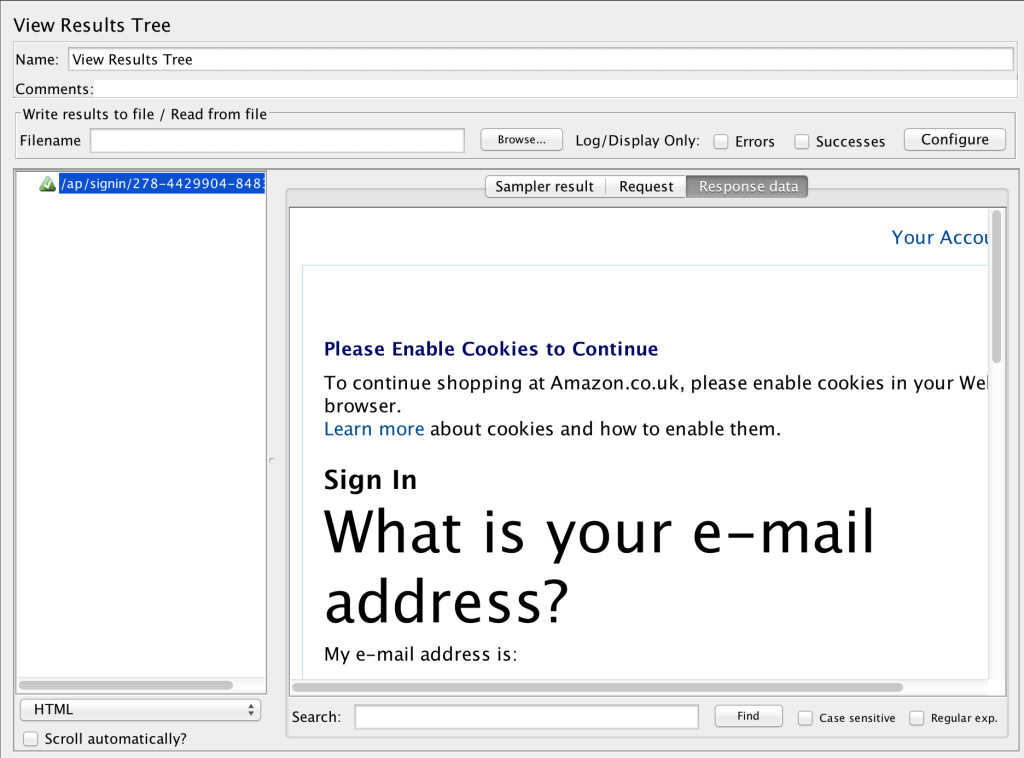
    Running the test confirms my hypothesis, since I observe the following result:

    results tree

    I’ll rename the request to something more meaningful and add a Response Assertion to check for some text (“What is your e-mail address?”), so we know the request is doing the right thing going forward.

    response assertion

    Now we need to submit some actual login details. Again, the best thing will be to submit an actual login and see what the proxy recorder tells us about the process. I did that while writing this post and saw the responses below:

    responses

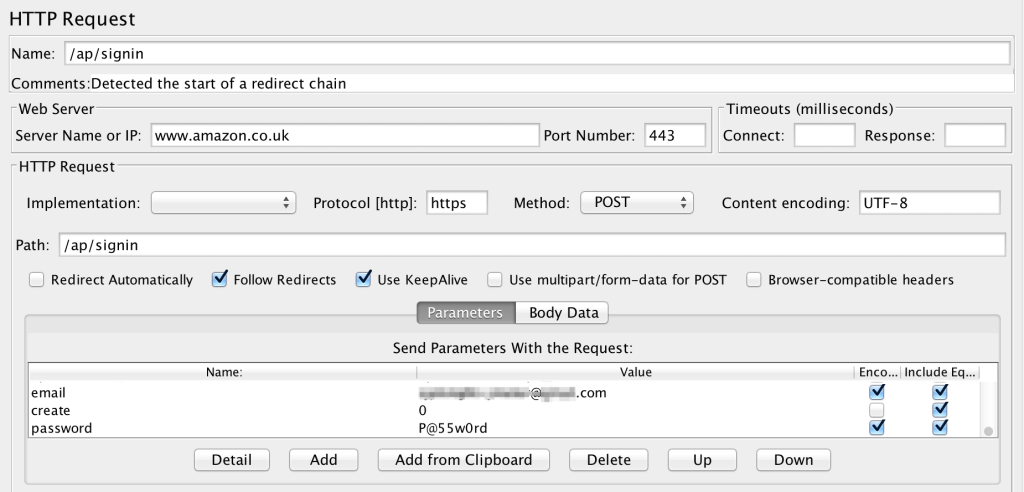
    The /ap/signin request seems like it’s probably the one doing the work, and closer examination shows that the request contains the username and password I used to login with.

    http request with username and password

    We can move that request up into our Test Plan as well, so it looks like the below, adding an assertion to check we’re actually logged in after making the request also. Let’s test for some specific HTML that we would only expect to see when we’re logged into the site. Something like “Your Browsing History” ought to do it.

    additional response assertion

    All good. We can go ahead and run that now, right?

    Wrong.

    There’s a problem. Can you tell what it is yet?

    what’s the problem?

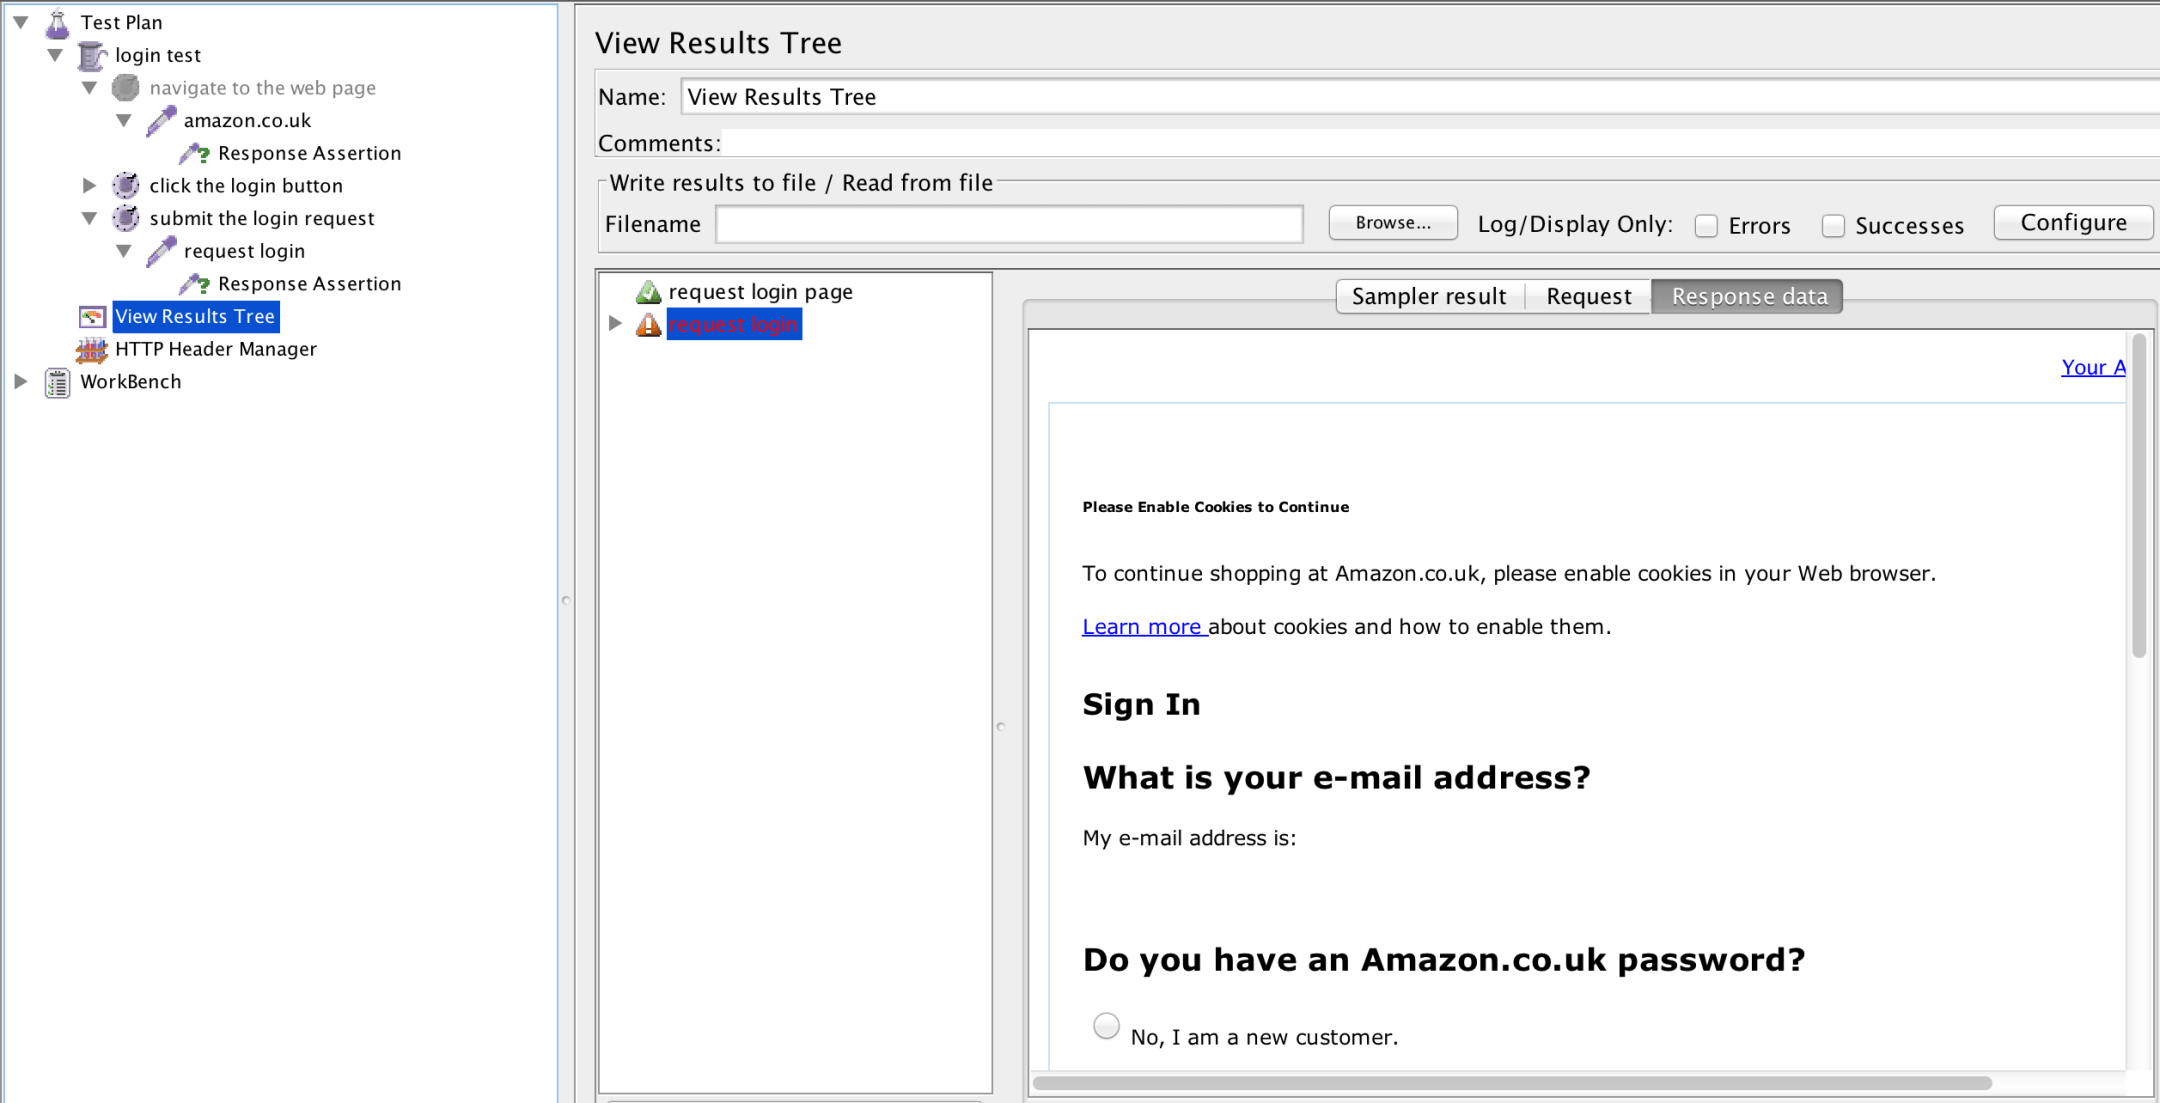
    The assertion has failed because JMeter didn’t get the page back that it expected. In fact, judging by the page we did get – it doesn’t look as though the login has worked at all.

    Why not?

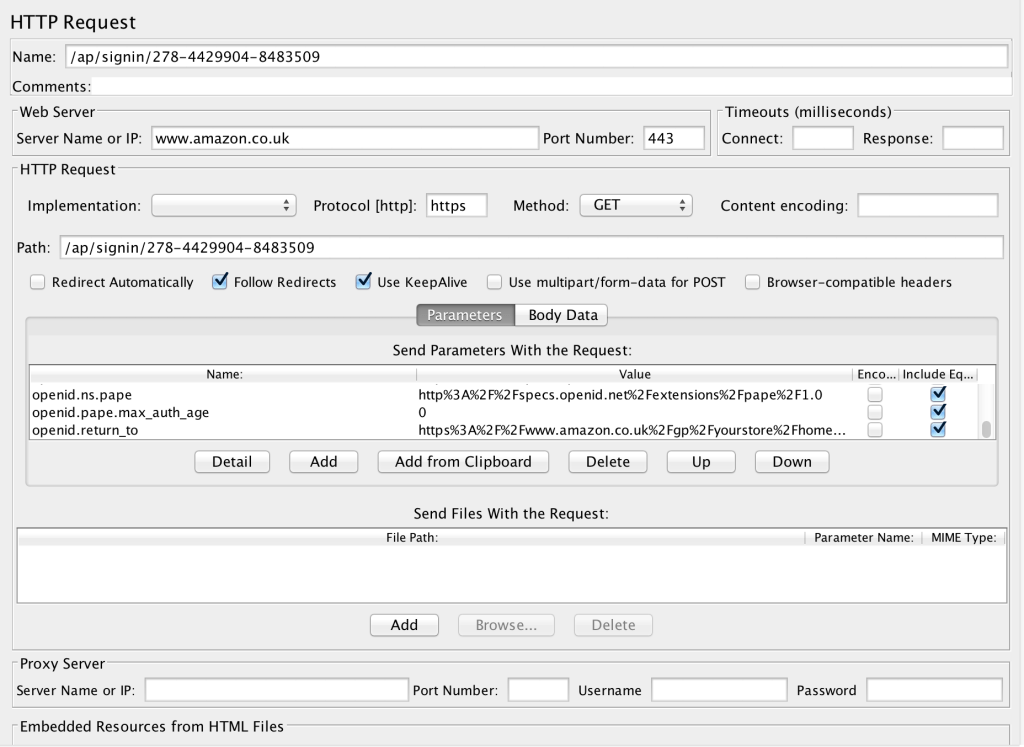
    If I take a look at the request again, there’s a few clues as to why…

    closer examination of http request

    The request is sending a token along with the (currently hard-coded) login credentials.

    It’s sending a bunch of other stuff over as well by the looks of it.

    http request params

    In all, there’s actually 11 dynamic variables that need to be correlated across from the previous server response in order for the login to be considered a valid request by the server.

    It’s going to take a bit of effort to get all that sorted out… I’ll show you how it’s done in the next post.

We use cookies in order to give you the best possible experience on our website. By continuing to use this site, you agree to our use of cookies.
Accept
Privacy Policy